Showing posts with label Project. Show all posts

Tuesday, March 13, 2012

DIY Williams Sonoma Air Freshener


You know how some candles smell so artificial that the house doesn't really smell better when burning it, just....different? Here's a solution I pinned and finally got around to trying.  It's a simple concoction of rosemary + lemon + vanilla + water simmered on the stove and brought to you by One More Moore.  As advertised, it makes the house smell lovely and fresh.  My only suggestion would be to use a decent sized pot and keep it at a very low simmer.  It got a little strong after a while, but the fragrance lightened and lasted several hours after I turned it off.


The rosemary came from my front yard and the vanilla wasn't the good stuff, both of which might make a difference. 

Check out these Pinterest follow-throughs, too!


and a few of my other finished Pinterest projects are here.

Wednesday, November 2, 2011

Airplane Tray Cover for Toddlers

Having flown many times now with my child, I can tell you that two of my biggest worries are 1. the germs he will encounter/suck in/consume, and 2. that he'll get bored/anxious/restless and freak out. To combat both problems, I threw together a little solution. Not long ago I pinned a brilliant idea I found at Serving Pink Lemonade to create an airplane tray table cover that includes activities to entertain babies (another version is sold here). Fantastic, but my kid is 20 months old and needs more entertaining, so I sort of combined that idea with a number of ideas I'd pinned for a quiet book. Here's the final product:


I strayed from the originals by using elastic on the sides so that hopefully it'll fit any width of tray table, and I made my cover double sided.  Thus, twice the entertainment.

Side 1 has:
-Counting activity - I knotted embroidery floss strung with either 1, 2, 3, 4, or 5 buttons on it so you can slide each button up and down. I used tractor, tiger, flower, fish, and ladybug buttons.
-A zipper pouch - this was the worst part. I read up on how to sew a zipper in, but I couldn't iron the fabric I used (a remnant from JoAnn that instantly scorched when I tried. I don't know what the fabric is, but it feels like a coated heavy-duty canvas) and it turned out pretty ugly. I'll put either small books in there or small surprises to be determined.
-Two doors hiding animals - I velcroed a wooden tiger behind the grass (made of felt) and a wooden whale behind the felt water.  Both animals can be removed since they're just velcroed on.  I sewed small buttons on the front of each door and added embroidery floss to create a "lockable" door by winding the floss around the button.  This part is important since the cover is double sided and I didn't want the doors hanging open when flipped upside down.


Side 2 has:
-A felt roadway
-Two vehicle iron-on patches that are secured with velcro and can be removed
-A garage for a toy car that velcros shut
-A felt doghouse that holds a dog keychain I found at Michaels that lights up and softly barks when you push a button.  If it's annoying, I can remove it.
-Next to the doghouse are food and water bowls made of felt and glued on.  C is really into "feeding" his stuffed animals, and I thought he might like to do the same with the toy dog.


So now we've gone on one flight where I used the tray cover.  It was on Southwest, and my cover was wider than the tray, which was fine.  If it's too big for the tray on another type of airplane or airline I'll consider either removing or shortening the elastic on the sides for a snug fit.  Anyway, the flight was supposed to be 2 1/2 hours, but ended up being about 3 1/2 gate to gate because of a delay in take off and a 1/2 hour of circling the destination airport.  We needed extra entertainment.  C loved the cars, the road, and the dog (although he wanted the dog off of the chain and I promptly lost the chain).  The counting beads were trouble.  C wanted to pull them and I ended up flipping it over to the car side right away since C was getting frustrated about not being able to remove the beads.  Maybe he'll appreciate it when he's older.  I think the cover bought us about 45 minutes of peace and quiet.

More Information:
- The fabric was 21" deep x 17 3/4" wide to start with, unfolded (resulting in a finished product, after hemming all around, of 20 1/2" x 17 1/4" unfolded or 10 1/4" x 17 1/4" as you'd see it on the tray).  The elastic bands add an extra 2 1/4" (each peice was cut to about 3") on each side (unstretched).  I could've went smaller, judging from our first use.  If I were doing it over, I'd probably make it 10" x 16 1/2" (after hemming) with 1 3/4" elastic on each side.
- I glued most of this together, but sewed on the dog house, garage, doors (hiding wooden animals), and obviously the zipper pouch and counting game.
The whole thing cost less than $20, with the most expensive parts being the patches (on the roadway side), the buttons used for the counting activity, and the toy car.  It could easily be done for less if you have buttons and velcro on hand and use toys your kids already have.  I found the wooden animals and dog keychain on clearance for pocket change at Hobby Lobby and Michael's and had the thread, floss, and glue on hand.

I'm adding this to the Pinterest Challenge sponsored by:
Bower Power and
Young House Love, with guests
Ana White and
House of Earnest

Go see what they did for the Pinterest Challenge, as well as all the fun projects completed by their readers!  Also, check out my last Pinterest Challenge project - a DIY car seat cooler - here. 

What are your favorite Pinterest finds?

Monday, October 31, 2011

TED inspiration

Everyone's aware of the TED talks, right?  Have you heard this one, by Matt Cutts?


Right.  Not long ago I set out to do something, learn something, or experience something new every day.  That didn't last long.  I ran out of ideas or didn't have time to come up with something or just felt uninspired.  So here's the deal.  Maybe I can come up with just twelve things to try and give each one my attention for one month.  November starts tomorrow...first month-long challenge:  increase the art/craft activities C and I do at home.  He's not terribly interested most days, so I'd like to pique his interest without forcing anything on him.  I'm shooting for 3-4 activities per week (he also has art activities daily at day care).  Anyone else up for the challenge?  Tell me what you're planning.

Tuesday, August 2, 2011

DIY car seat cooler

When we switched from a backward to a forward facing car seat that would stay in the car, I started looking for solutions to the inevitable bun burn that occurs upon returning to the car after even just a few minutes on a 100+ degree day.  Here in the desert we have months of 100+ degree days and a few 110+ degree days just for fun every year, and it's easy to get actual burns from seat belts, etc. when you get in the car.  Enter the ladies at eighteen25.  Also desert-dwellers, they posted a tutorial to make an adorable car seat cooler...here, which I promptly pinned. 

** Important note:  I'm no seamstress.  I can sew a straight line.  Sometimes.  I don't know proper sewing terminology and I don't like to measure.  If there's a sewing shortcut, I'll take it, however ill-advised.

I used laminated cotton so I could just wipe it down.  The fabric is Nicey Jane Laminated Cotton Lindy Leaf Blue from fabric.com (currently $15.98/yd). 

Using the car seat as my guide, I cut the fabric to roughly 39" x 56".  I cut it 56" wide so I could just fold it over and save myself one seam. 


the layout


Next I cut six slits through one side (which will be the "back").  These will eventually be the slots for freezer packs.  In order to prevent the slits from fraying or ripping, I made bias tape from some scrap white cotton and sewed it on (I think it could be classified as bias tape.  Am I wrong??). 

Slits to insert ice packs
My car has head rests in the back seat, so next I sewed ribbons to the top inside edge of the cover so I can tie it to the head rest bars so it won't just slump down into the seat. 
ribbons to tie to head rest
 Next step, I basically sewed the whole thing into a pillowcase, leaving a gap at the top (between the ribbons) so I could turn it right side out.  Then I sewed closed the gap.
the back after sewing sort of a pillowcase
 At this point I thought I was some sort of genius.  I'd had no problems despite winging the whole thing.  Ahem.  I'm no genius.  The next step was to sew vertical and horizontal lines to hold the ice packs in place.  All I needed was three vertical lines (one down the middle and one on each side - the ice packs would go between the lines, three on each side) and three horizontal lines.  It turns out the laminated cotton wouldn't feed through my sewing machine.  Apparently a walking foot would've worked, but I don't have one.  I attempted to get some traction by laying down a strip of blue painters tape and sewing over it, but it still didn't feed properly and the tape didn't come off well.  It really loosened my stitches when I removed the tape.    Foiled by straight lines.  In the end I pulled my fabric through, which resulted in ugly, uneven stitches, but stitches that held.  I also sewed the bare minimum required to hold the ice packs (rather than sewing all the way across).


Done, folded, and tied.  Ready for the freezer.

In the car
 Listen, I'm first to admit that this wasn't well thought out, but it didn't turn out to be a total disaster.  It'll work, and it is cute unless you take a close look at the stitches and puckering.  In retrospect, I should've read up on laminated cotton before I bought it.  It wasn't a total bust, though.  C's bottom, back, and arms are oh-so-comfortable while I steer with a kleenex barrier between my hand and the steering wheel. 

Read more tales of pins coming to life here:

bower power
style by Emily Henderson
making a house a home
young house love (which links to a lot of other completed, Pinterest inspired projects)

*Follow-up, August 16, 2011.
We've been using this awhile now, and it's actually pretty great.  I made it wide enough and long enough to cover the entire seat and sides, and that, my friends, was a wise decision.


Wednesday, February 16, 2011

Project 2011 February 15, 2011

Dinner - Turkey sandwiches, spinach salads

C's Dinner - Suddenly stubborn, C decided he would only eat that which he could feed himself.  Banana, graham cracker sticks, steamed broccoli. 

Accomplishment - finally bought the last of the supplies I need for C's birthday party.  Stripey straws, stuff to make a bd crown, balloons (they're ordered anyway), bd candles.  All that is left is deciding where we'll get lunch.  Oh, and baking two cakes.  Can you rent ice cream machines somewhere?   We don't have the cabinet space for yet another appliance, but it sounds so good.

Tuesday, February 15, 2011

Project 2011, February 12-14

Dinners - Gnocchi with feta/spinach/chicken sausage and salad (Valentine's Day), ham and swiss panini, eggs with toast and fruit

C's Dinners - chicken with snow peas, berries and yogurt blend, baby chicken meatballs and acorn squash

C will now throw a ball back to me when I roll it to him.  It's best to be more than a couple of feet away when it happens.  The boy has an arm.  He also delights in any kind of peek-a-boo game.  Especially if he's the peeker and you act extremely surprised to see him.  Adorable!

We're almost done with the bathroom makeover.  Pictures forthcoming!  Next we're moving C to his own room now that he sleeps almost entirely through the night.  The other day he fell asleep in the living room and I was struck by how big he suddenly looks. 

Project 2011 February 3-11 Funding the doctor's vacations

Poor C's been sick again and I've been swamped with taking time off to take care of him and making up the time at work.  Two visits to the doctor and several late nights of work later, I think we're emerging.

Dinners I remember - salmon and fettuccini, chili and grilled cheese, french toast and turkey sausage

C's Dinners - he didn't feel much like eating, so I indulged him and fed him whatever he'd take.  A lot of baby cereal, bananas, steamed broccoli, and carrots.  Once he felt better he had a pretty tasty concoction of salmon, cous cous, and spinach.

Thursday, February 3, 2011

Project 2011, February 2 - happy new year.

Dinner - BB was at a concert.  I had cold cereal and fruit

C's Dinner - Baby oatmeal and apricots, part of my apple, a tiny bit of whole wheat toast

Today's enrichment activity was supposed to be learning about another culture and religion. We were invited to a Chinese New Year celebration at the Buddhist Prayer Center down the block.  BB was going to be gone, but it seemed really interesting and would be a good opportunity to welcome them to our neighborhood.  C woke up from an impromptu nap at 6:00 and we headed over.  At 6:00.  Like the invitation said.  The two guys who met us on our way up the walk were very nice, but said that it didn't start until 7:00 with the dragon dance at 8:00.  I fumbled my way through an excuse for my early arrival without saying that the invitation said it started at 6:00 and probably seemed weird since I kept introducing myself and C to everyone there.  No one introduced themselves to us.  Awkward.  Anyway, they repeatedly asked us to come back for food and the dance, but C goes to bed by 8:00 and let's face it, I was embarassed. 

Wednesday, February 2, 2011

Project 2011, February 1

Dinner - Cream of Wheat and toast (it was cold!)

C's Dinner - brown rice/applesauce/avocado/banana blend

Researched infographics for potential growth in my position at work.

Tuesday, February 1, 2011

Project 2011, January 31 - Goodbye splinters!

Dinner - Again with the soup.  Mrs. Grass.  Hello sodium.

C's Dinner - acorn squash, peaches, rosemary chicken and brown rice

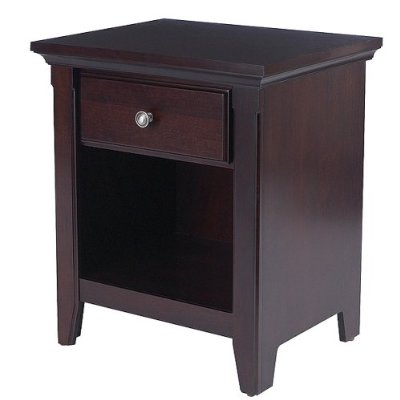
So about 10 years ago I bought this large wicker chest to use as a coffee table, which I sold when we moved to LV.  Anyway, the chest came with two square wicker boxes inside that I've been using as end tables ever since.  When we got our kitty, he insisted on scratching them, and they're now really splintered and ugly (and unsafe for a toddler that likes to stick things in his mouth).  Yesterday we finally upgraded to this:


Avington Side Table, $89.99 (currently on sale for $69), Target
We bought two, but they're bigger than I'd expected, so we've only put one together.  Might take the other back.  Like the two other Avington pieces we own (TV stand and coffee table), it's very sturdy and was easily assembled.  Some of C's favorite hobbies are taking the newspapers and CDs out of the TV stand drawer and banging remote controls on the coffee table.  So far they've survived unscathed. 

In assembling the new table, I noticed a glaring difference between BB's methodology and my own.
He - believes instructions are just "one man's opinion" and feels nothing done without the aid of power tools is worth doing
She - reads and follows the instructions to the letter, including the part where it says NOT to use power tools and where it recommends counting all screws, etc, prior to getting started to make sure everything is there.

Of course I'm right, right?

Project 2011, January 28-30

Dinners - ho-hum.  Spaghetti, instant soup (BB wasn't feeling well), tons of appetizers (darts and football on Sunday night), this dip was good.

C's Dinners - pasta and veggie sauce (hated it and developed a mild rash), pork and apple blend, baby smoothie (mango, banana, blueberries, and whole milk yogurt), asparagus and peas, lima beans

For a minute I thought I'd accomplished a lot, but then I realized that the rug I bought was too small and the test cake I made for C's birthday was too bread-like.  Try, try again. 

Friday, January 28, 2011

Project 2011, January 27 - Stats

Dinner - Subway (we were short on time)

C's Dinner - Mango, Halibut with corn, tomatoes, edamame, basil, & garlic.

Enrichment - Studied up on statistics.  Here, here, and here.

Thursday, January 27, 2011

Project 2011, January 26 - At least dinner was good.

Dinner - Lasagna soup

C's Dinner - chicken and noodles, peas (the kid can't get enough!)

A rough day.

Project 2011, January 25 - The Food Police

Dinner - BBQ chicken pizza (similar to this recipe, but without cilantro and gouda and with green bell pepper), pineapple

C's Dinner - roast pork and potatoes, a tiny bit of pineapple

I mentioned that C moved into the toddler room at day care, right?  Well, apparently that means he can have school lunch now.  Monday that was chili and corn bread.  Tuesday was sweet and sour chicken and rice (both days with a fruit and vegetable).  They offer it to the kids and if they don't eat it, they give them the lunch the parents send from home.  So I guess I was busy reeling from the thought of my baby being a "toddler" on Monday, because I didn't give the lunch a great deal of thought until that night.  Then I pictured him eating canned chili.  Canned, sodium-filled, preservative-laced, questionable meat-stuffed chili.  All going into my breastfed, organic only boy.  So, with Jamie Oliver-esque passion, I called the daycare director.  Expecting conflict.  Scary conflict.  Apparently most parents have this break down when their kids go to the toddler room, though, because the director was totally prepared and knew all the answers to my questions, even if I didn't like some of them.  She acknowledged that the USDA standards aren't high enough, but it's what they have to go on.  SO, I'll be sending his lunches from home and approving any snacks or additional food on a weekly basis.  I feel better, but it begs the question - why don't Americans care enough about their kids' nutrition and all of the implications of the quality of their diets to object to the ickiness that is the standard school lunch?  I'm certainly placing all of the blame on the schools.  It's also our lawmakers that need to understand that this is an important issue.  So, please, educate yourself on what your kids are eating at school, contact your representatives, educate your child on food nutrition, and have a discussion with the dietician/principal/PTA/school board at your child's school.  See if there's any way you can help.


Image from Vertical Harvest of Jackson Hole.

Here's more:
http://www.schoolnutrition.org/default.aspx
http://healthyschoolscampaign.org/
http://fedupwithschoollunch.blogspot.com/ (a blog by Mrs. Q, who ate school lunch every day in 2010 with her students)

Tuesday, January 25, 2011

Project 2011, January 24 - Leaps and Bounds

Dinner - Tropical Smoothie Cafe, due to a late and prolonged run to various stores to find shoes for C.  They're required in the toddler room at daycare.

C's Dinner - Steamed mixed vegetables, pork/apple/sweet potato puree

Milestone (!) - C moved up to the young toddler room at day care.  On his first day he fed himself lunch (!!!) while sitting in a tiny chair at the table (!), he laid down to nap at nap time (in his old, baby room he could nap whenever he wanted to), and he didn't cry at all.  Big boy.

Celebrate the BOY!

If you've ever shopped for a boy, you've noticed the dearth of cute, non-sports related, non-cartoon character options out there.  Especially in comparison to what is available for girls.  The same holds true for sewing and craft projects.  Thus, the geniuses at Made by Rae and MADE are endeavoring on another month of posts devoted to boys!  So, get over there and bookmark or start following!  Celebrate the boy month will run from February 15 to March 15 this year, but until then you can look into past projects - and a whole lot more - on their respective sites. 

Here's one of my favorite projects from last year's Celebrate the Boy series:

Green Thumb Overalls

Monday, January 24, 2011

Project 2011, January 21-23 - F is for Failure

Dinners - turkey sausage/pasta bake, Lucille's, leftovers 

C's Dinners - Turkey & green beans, salmon & broccoli/cauliflower mix, mango/yogurt puree & beef roast & carrots

Enrichment - Learning from failure.  Okay, so obviously it's not something I set out to do, but I have a very real fear of failure, and it holds me back.  I know that growth emerges from uncomfortable experiences and often failure, but I avoid them both, which means I rarely try new "scary" (to me) things and if I get the slightest whiff of failure I abort the mission and never try again.  This weekend was a series of minor failures, but I'm forcing myself to try again on all fronts.  Maybe one day I'll be brave enough to take bigger risks.
Failure #1 - I chose an awful paint color for the bathroom.  Then I kept using it after my test spot was ugly.  (Behr Winter Lake)
Failure #2 - Clearly cutting the paint in along the ceiling is not my forte.  Strike that.  It is not currently my forte.
Failure #3 - This is pathetic.  I was going to call my aunt and ask her for kolache tips, but I chickened out (we're not close in any way and neither of has ever called the other, but it would be nice to forge a better relationship).  I'm not really sure what scares me about this. 

So, although I don't trust my ability to pick a paint color or edge the ceiling, I'll be painting the rest of the house.  Lucky for me BB is utterly color blind. 

I can't have C growing up thinking that it's okay to let life pass him by and to stop dreaming altogether out of fear.  So, no matter how uncomfortable it is for me, I'll let him see me try and fail and try again.  And hopefully gain confidence. 

Project 2011, January 19 & 20 - Home Improvement?

Dinners - breakfast burritos & apples, spanish-style halibut and spinach & pineapple

C's Dinners - Beef stew & pears, mango/pineapple/banana blend & broccoli & lima beans

Enrichment - worked on updating our powder room - last weekend we removed the baseboards and everything attached to the wall (tp holder, etc).  Now we've installed new baseboards and started with the installation of wainscoating.  I'll post pictures when we're done.  This has been a learning experience . . . lesson #1:  tile chips rather easily.  Lesson #2:  expect the walls to form something other than a 90 degree angle.  Lesson #3:  builders don't necessarily use acutal wood for baseboards, and whatever it is that they use smells bad and probably causes a multitude of health problems when you breathe the particles. 

We also went to another Gymboree class and were shunned.  This was one tight-knit group, and clearly they weren't excited to welcome any newcomers.  The theme was social interaction, which just makes the whole ordeal laughable.  Anyway, "thank you" to Rylen's Grandma, who was the only person to willingly speak to me and encourage interaction among the kids.  I'm going back to the Sunday class.  Thankfully, C is too young to notice.  I think.

Wednesday, January 19, 2011

Project 2011, January 18

Dinner - chicken quesadillas with spinach and avocado, pineapple
C's Dinner - asparagus/pea blend, chicken and noodles

Milestone Achieved (!) - C slept through the night!!!  A full 8 hours passed before I heard a peep.  Now why am I a touch sad that he's growing up?

Enrichment - Listened to a lecture on Biostatistics from UC San Diego

Tuesday, January 18, 2011

Project 2011, Catching Up

I have a little catching up to do from when C was sick...here's what I remember:

Dinners - Healthy Buttermilk Chicken Fingers, New Potatoes with Roasted Garlic Vinaigrette, Turkey Reuben Sandwiches, Southwestern Spiced Sweet Potato Fries, Seared Scallops with corn and basil salad, chicken salad with potatoes and arugula

C's Dinners - basically whatever I could get him to eat, which means a lot of his favorites - mango, peas, baby oatmeal with prunes or apricot mixed in.  He also had sweet potatoes, mixed vegetables, and chicken and bok choy puree.  (this was the first time I've had bok choy, to my knowledge, and I love it!  Yay for learning from my baby!). 

Enrichment (I have to retitle this section.) - Very little.  Worked on a new project I'll post about when I have pictures and took C to a new park with an equestrian area.  He loved the horses and kept saying "hi. hi. hi" to them, but squeezed BB's thumb really tightly when they came near.